BigFix allows you to capture fat images and then deploy them throughout your environment with the Systems Lifecycle domain. A fat image contains all applications, settings, branding, patches, and so and then captures that state. These can also be quite large with all of the applications in your environment. Once you capture the image, you can deploy by using the relay infrastructure and bare-metal and reimage over the wire. This is the traditional way of imaging a computer and with the advent of Windows 10 that is a thing of the past. Doing a fat image, you are unable to be dynamic, so anytime an application updates or a patch needs to be installed, you have to recapture the image. This is a tedious and inefficient process.
This article demonstrates how to use BigFix to set up post-configuration steps that are 100% ready from day one. You can utilize the power of BigFix relevance during the deployment process. BigFix uses MDT in the background to deploy Windows images; although that is a powerful technology, there are some limitations. The article explains how to use the best of both the worlds where you are layering down a Windows ISO or image and then installing the necessary software, patches, drivers, and branding so the PC or server is 100% compliant.
The method explained in this article allows you to be dynamic with your images and be much more efficient. You do not need to spend your time updating and capturing a new image if there are new patches or software updates needed on the image. All you have to do is update the software package and or add the patches to the basic windows ISO as part of the process. You just need 5 minutes to update the baselines as opposed to a couple of hours on capturing and deploying the images.
Being a former customer, I could employ this method to build one single image for a global company - install the necessary base software, branding, patches, and language packs and also used relevance so if a certain site needed software, it would only install that software on that site and not the rest of the company. The same applies to language packs - we would ensure a Chinese computer only had Chinese installed and display Chinese when the computer was built.
Before creating phases, be sure to complete the steps outlined in Setting up Bigfix OSD and Bare Metal Imaging.
Creating OSD phases
The following steps will help you create a custom site OSD and create a series of steps so it runs through 3 baselines called Phases 1, Phases 2, and Phases 3 after a computer is imaged. The reason for multiple baselines is to organize the process. If you have one large baseline, it can get complex. You can add more phases as well depending on your specific requirements.
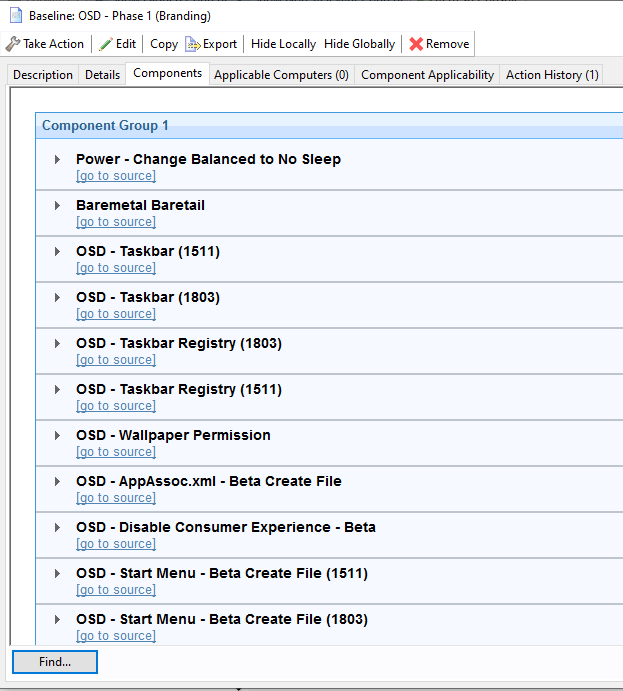
- Phase 1 – Branding
Guide to setup removing unwanted ModernUI Apps
Guide to create a custom start menu during the imaging process
Custom App Associations
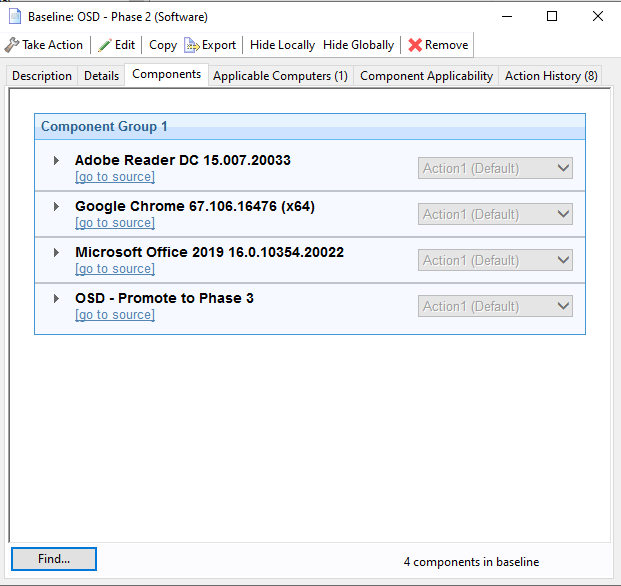
- Phase 2 – Software
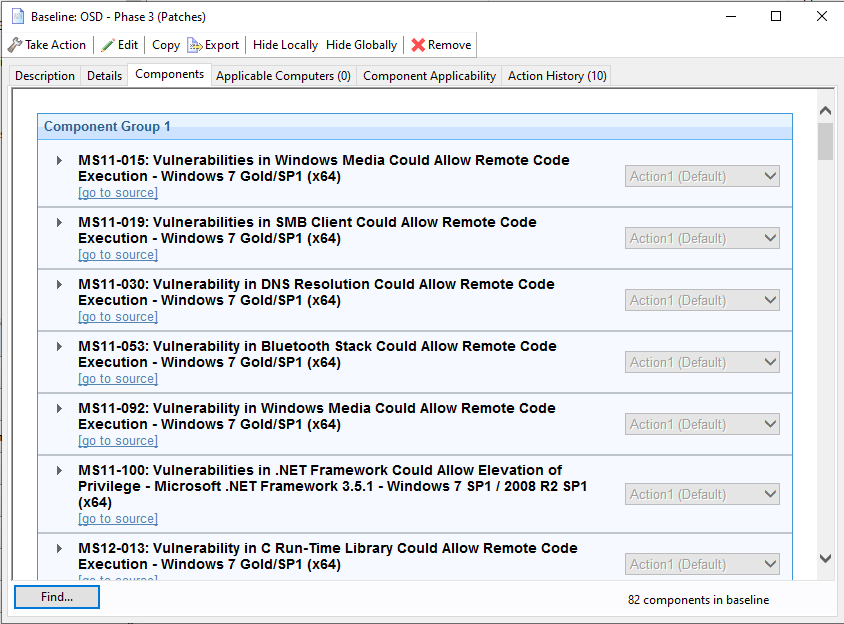
- Phase 3 – Patches not in the image. Phase 3 reboots the computer so once it is at the CTRL + ALT + DEL screen, you know the PC is completely imaged.
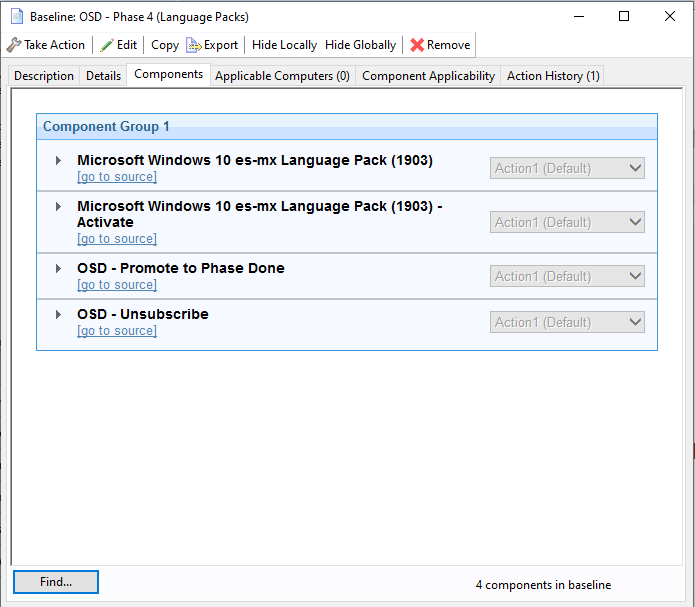
- Phase 4 - Language Packs. Here is a link to a guide on how to package language packs via BigFix
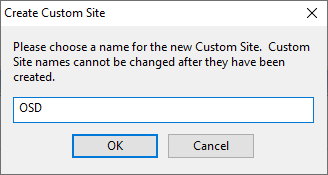
- Create a new Custom Site called OSD.
- Change computer subscriptions to match a Relevance Expression that returns true.

- Click Edit Relevance.
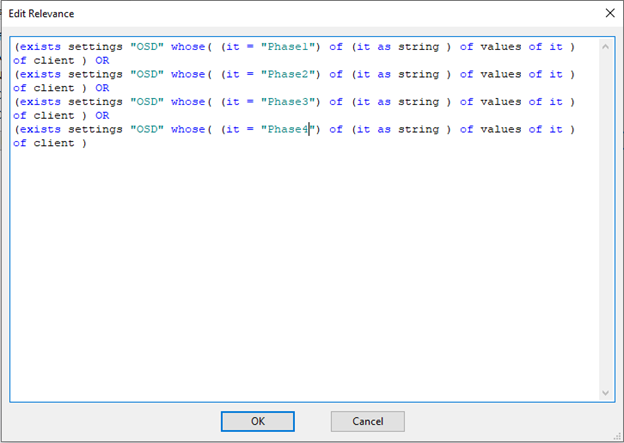
- Add the statement given below and click OK.
(exists settings "OSD" whose( (it = "Phase1") of (it as string ) of values of it ) of client ) OR
(exists settings "OSD" whose( (it = "Phase2") of (it as string ) of values of it ) of client ) OR
(exists settings "OSD" whose( (it = "Phase3") of (it as string ) of values of it ) of client ) OR
(exists settings "OSD" whose( (it = "Phase4") of (it as string ) of values of it ) of client )
- Save the changes.
Creating OSD Fixlets, Tasks, and Baselines
Create 4 Tasks and 1 Fixlet in the OSD site.
Note: The Fixlet is used for the patching baseline to promote to the next phase.
- Click Fixlets and Tasks.
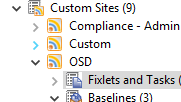
- Create a task called "OSD – Promote to Phase 2".
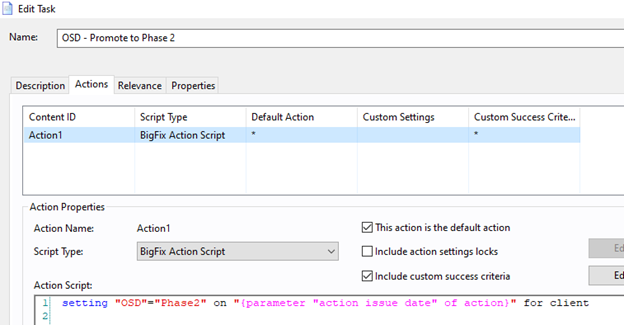
- Open the Actions tab and enter the action script given below:
setting "OSD"="Phase2" on "{parameter "action issue date" of action}" for client
- Open the Relevance tab. Add the statement given below:
(not exists settings "OSD" whose( (it = "Phase2") of (it as string ) of values of it ) of client )

- Create a Task called "OSD – Promote to Phase 3".
The action script
setting "OSD"="Phase3" on "{parameter "action issue date" of action}" for client
The Relevance
(not exists settings "OSD" whose( (it = "Phase3") of (it as string ) of values of it ) of client )
- Create a Fixlet called "OSD – Promote to Phase 4"
Note: This is a Fixlet due to being in the same basleine as patching Fixlets and not Task.
The action script
setting "OSD"="Phase4" on "{parameter "action issue date" of action}" for client
The Relevance
(not exists settings "OSD" whose( (it = "Phase4") of (it as string ) of values of it ) of client )
- Create a Task called "OSD – Done".
The action script
setting "OSD"="Done" on "{parameter "action issue date" of action}" for client
The Relevance
(not exists settings "OSD" whose( (it = "Done") of (it as string ) of values of it ) of client )
not pending restart
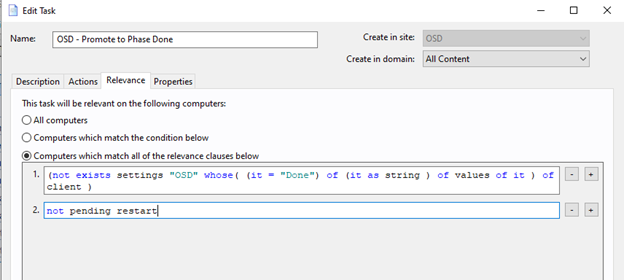
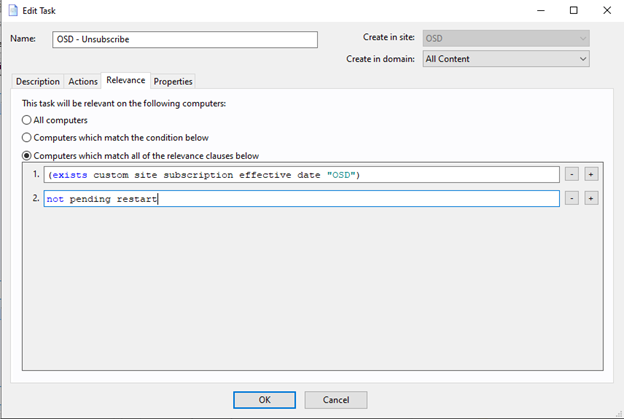
- Create a Task called "OSD – Unsubscribe".
The Action Script
custom site unsubscribe "OSD" on "{now}"
The Relevance
(exists custom site subscription effective date "OSD")
not pending restart
- Expand the OSD site entry and click Baselines

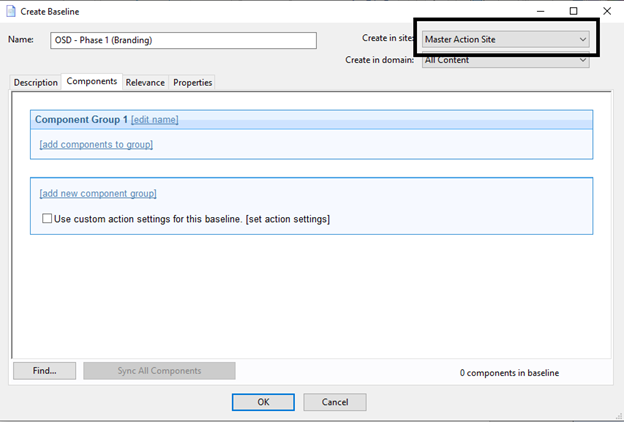
- Create a Baseline called "OSD – Phase 1 (Branding)" in the Master Action Site.
- Open the Relevance tab and select Computers which match all of the relevance clauses below.
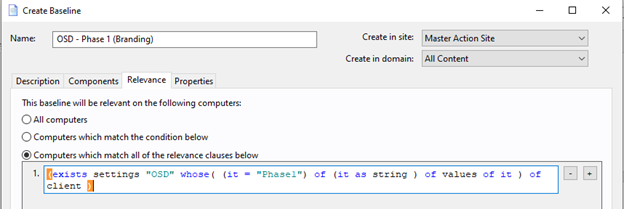
Paste this statement in the clause
(exists settings "OSD" whose( (it = "Phase1") of (it as string ) of values of it ) of client )
Create a Baseline for OSD – Phase 2 (Software) with the clause below
(exists settings "OSD" whose( (it = "Phase2") of (it as string ) of values of it ) of client )
Create a Baseline for OSD – Phase 3 (Patches) with the clause below
(exists settings "OSD" whose( (it = "Phase3") of (it as string ) of values of it ) of client )
Create a Baseline for OSD – Phase 4 (Language Packs) with the clause below and create in the OSD site we crated earlier
(exists settings "OSD" whose( (it = "Phase4") of (it as string ) of values of it ) of client )
You should now have 3 baselines in your newly created OSD site and 1 baseline created in your Master Action Site (Be sure to show non relevant content).


- Open Phase 1 and add the Promote to Phase 2 Task.
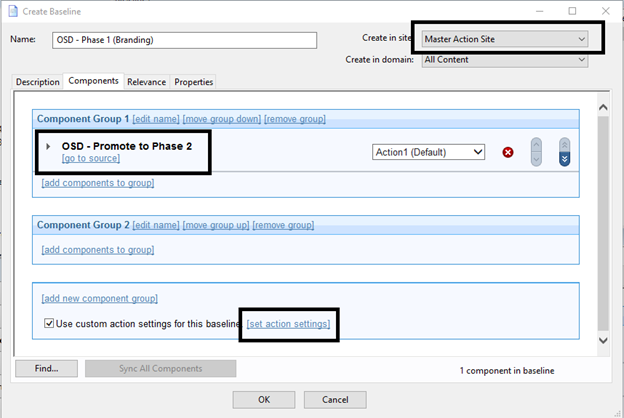
Note: This Task always needs to be at the end of the baseline.
- Click set action settings.
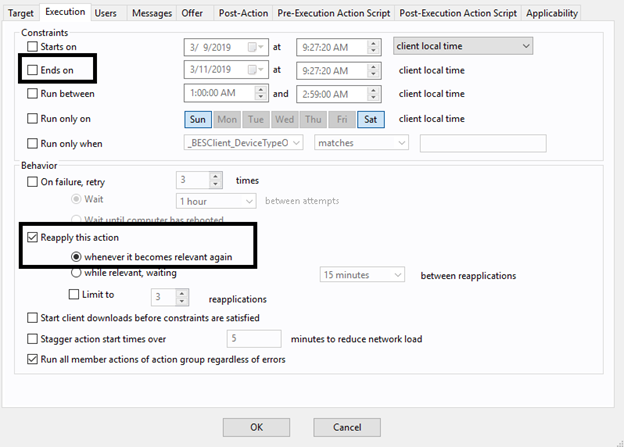
- On the Execution tab, deselect Ends On to make it a policy action and select Reapply this action when it becomes relevant again.
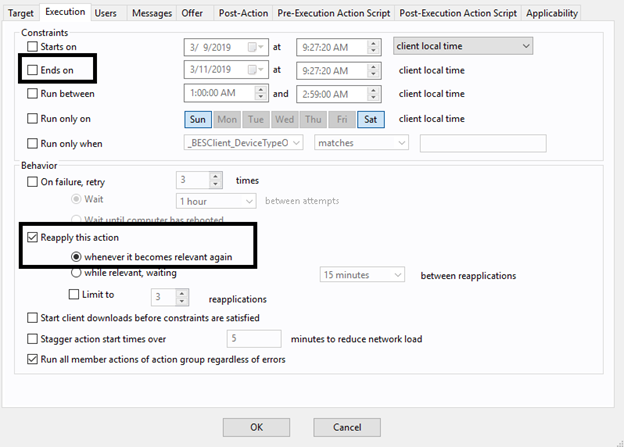
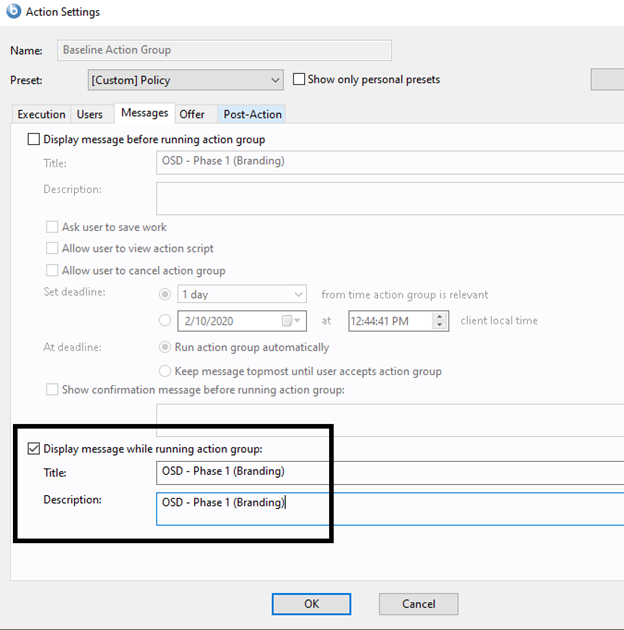
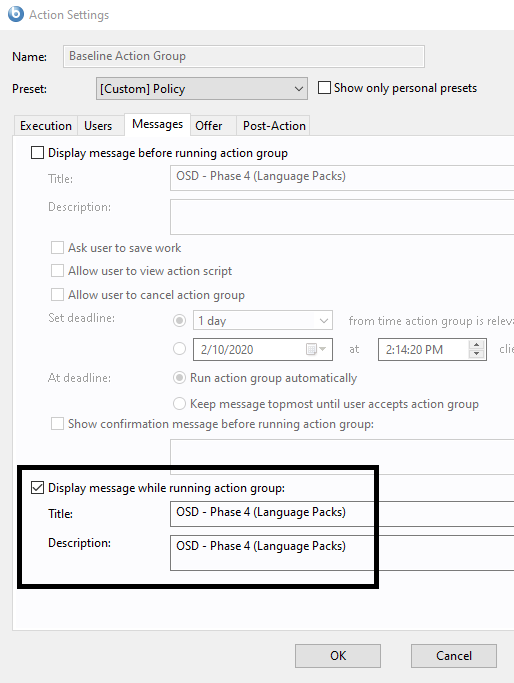
- On the Messages tab, select Display messages while running action group.
- Enter "OSD – Phase 1 (Branding)" in Title and Description.
- Open the Baseline OSD – Phase 2 (Software) and add the task OSD – Promote to Phase 3.
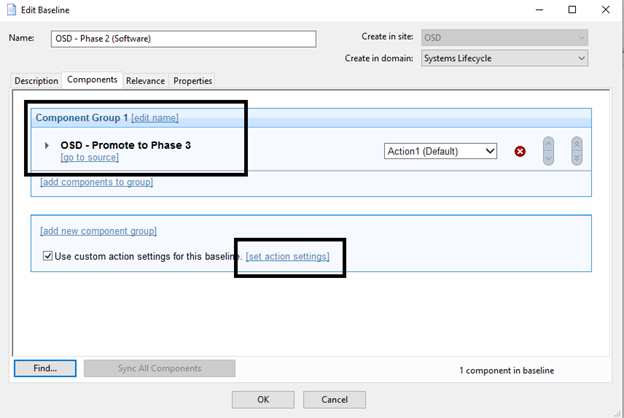
Note: This Task always needs to be at the end of the baseline.
- Click set action settings.
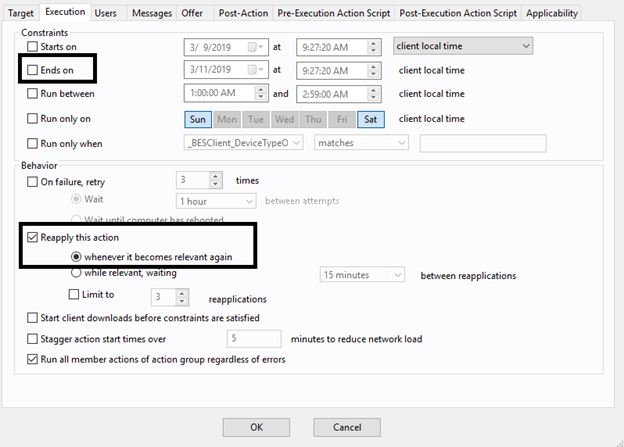
- On the Execution tab, deselect Ends On to make it a policy action and select Reapply this action when it becomes relevant again.
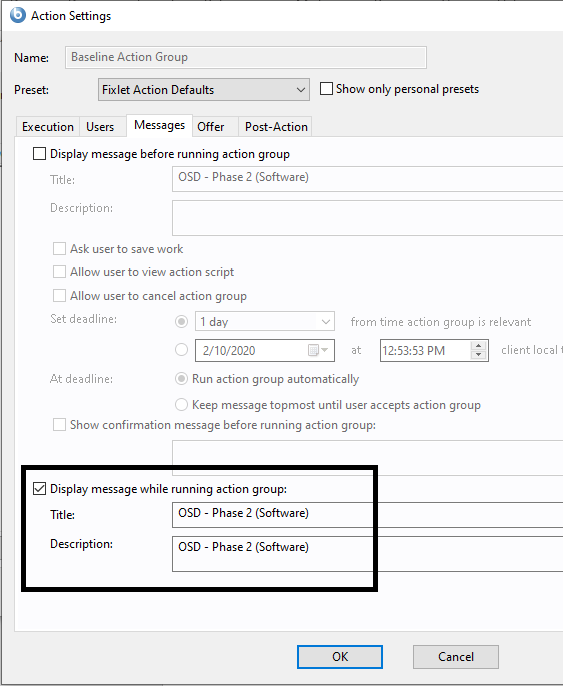
- On the Messages tab, select Display messages while running action group.
- Enter OSD – Phase 2 (Software) in Title and Description.
- Open the Baseline OSD – Phase 3 (Patches) and add the Fixlet OSD – Promote to Phase 4.
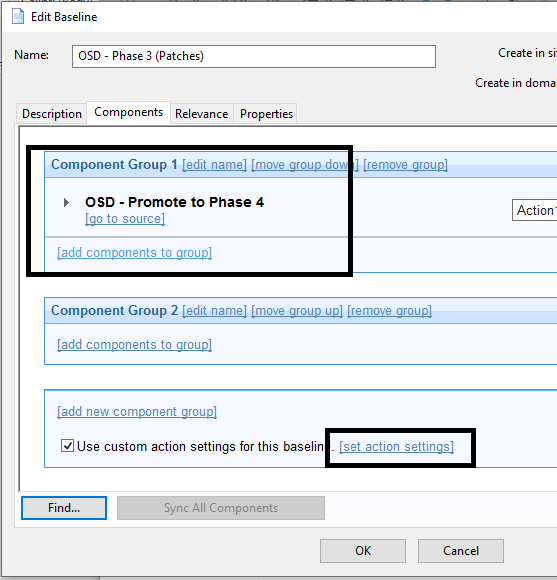
Note: This Task always needs to be at the end of the baseline.
- Click set action settings.
- On the Execution tab, deselect Ends On to make it a policy action and select Reapply this action when it becomes relevant again.
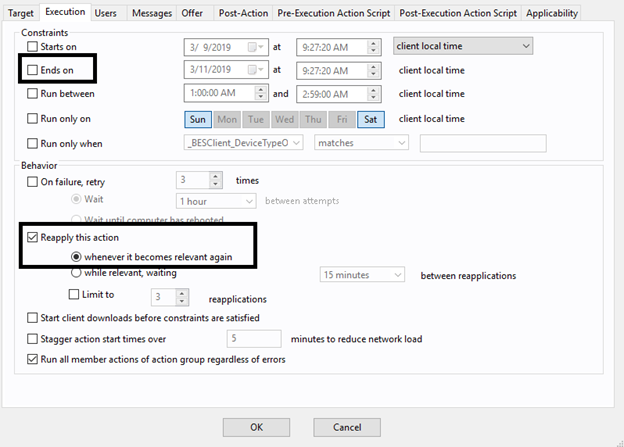
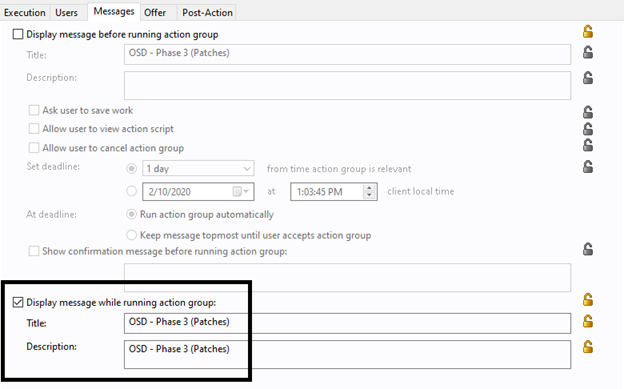
- On the Messages tab, select Display messages while running action group.
- Enter OSD – Phase 3 (Patches) in Title and Description.
- Open the Baseline OSD – Phase 4 (Language Packs) and add the two Tasks OSD – Promote to Done and OSD - Unsubscribe.
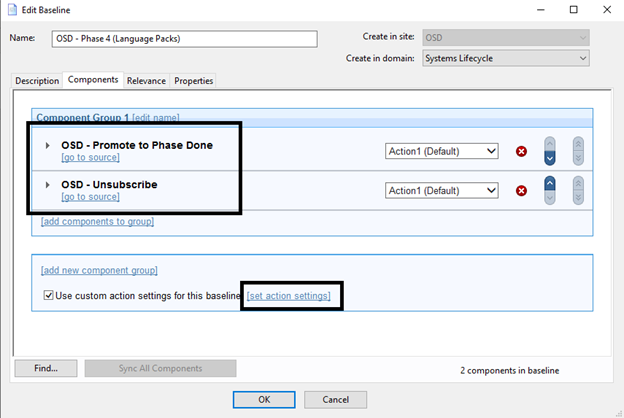
Note: This Task always needs to be at the end of the baseline
- Click set action settings.
- On the Execution tab, deselect Ends On to make it a policy action and select Reapply this action when it becomes relevant again.
- On the Messages tab, select Display messages while running action group.
- Enter OSD – Phase 4 (Language Packs) in Title and Description.
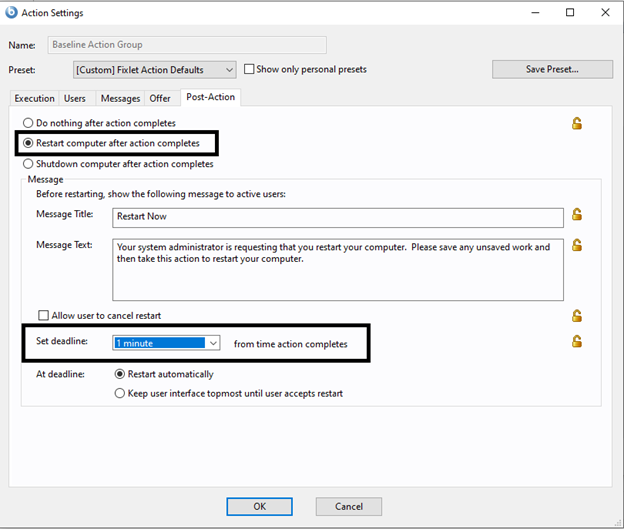
- On the Post-Action tab, select Restart computer after action completes.
- Change the deadline to 1 minute.
- Create 4 computer groups.
- Create OSD – Phase 1 in the Master Action Site.
Note: Do this step with a Master Operator account.
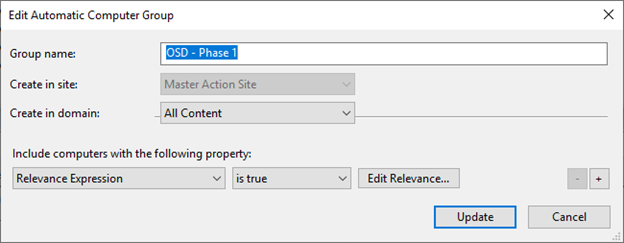
The Relevance Expression is
(exists settings "OSD" whose( (it = "Phase1") of (it as string ) of values of it ) of client )
- Create OSD – Phase 2 in the OSD site.
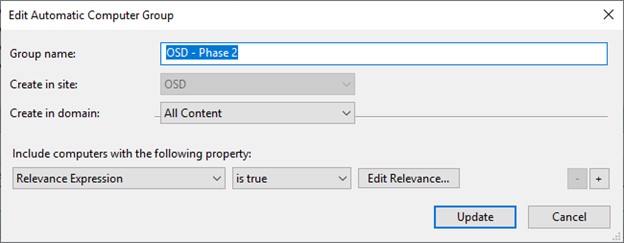
exists settings "OSD" whose( (it = "Phase2") of (it as string ) of values of it ) of client )
- Create OSD – Phase 3 in the OSD site.
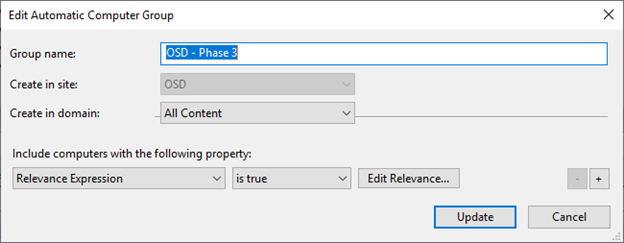
(exists settings "OSD" whose( (it = "Phase3") of (it as string ) of values of it ) of client )
- Create OSD – Phase 4 in the OSD site.
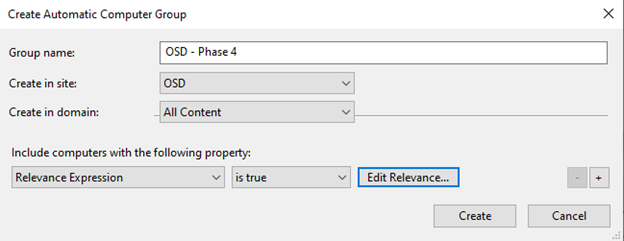
(exists settings "OSD" whose( (it = "Phase4") of (it as string ) of values of it ) of client )
- Deploy the 4 baselines.
- Open OSD – Phase 1 and take action.
- On the Target tab, select Dynamically target by property.
- Select By group and the OSD – Phase 1 group.
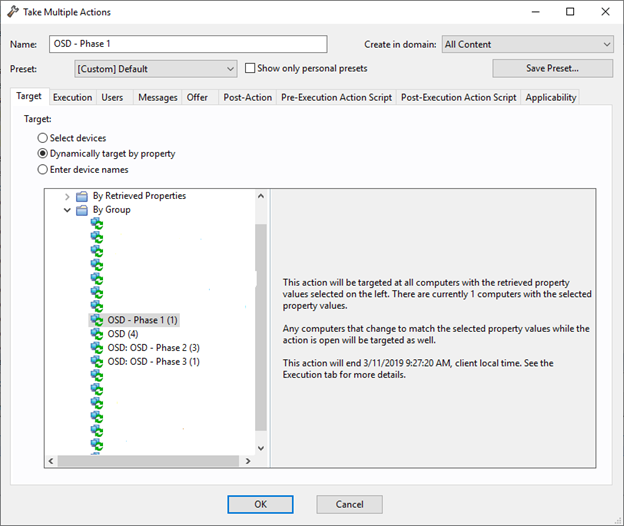
Review the Execution tab and Messages tab to verify the action settings applied to the baseline are selected.
- Click OK to take this action.
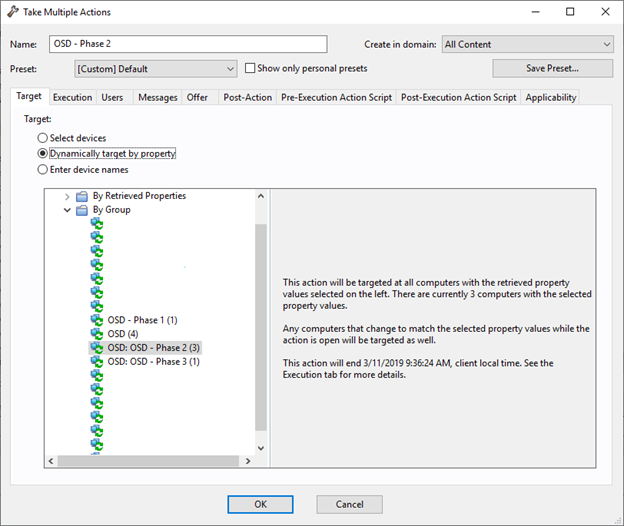
- Take action on OSD Phase 2.
- Select Dynamically target by property and By Group and then select OSD – Phase 2.
- Take action on OSD Phase 3.
- Select Dynamically target by property and By Group and then select OSD – Phase 3 Group.
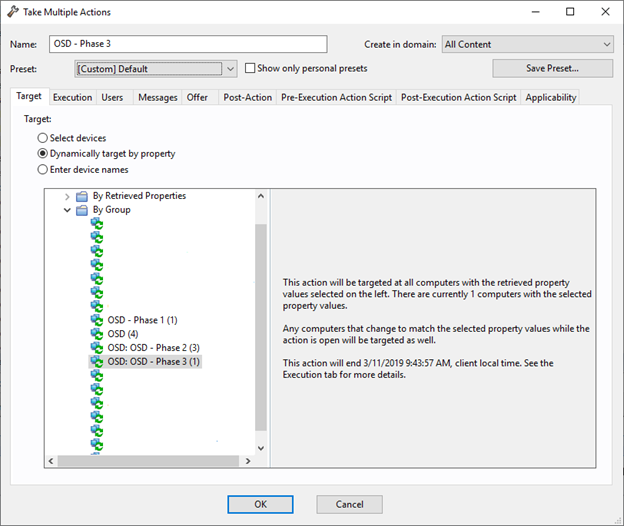
Review the Execution tab and Messages tab to verify the action settings applied to the baseline are selected.
- Click OK to take this action.
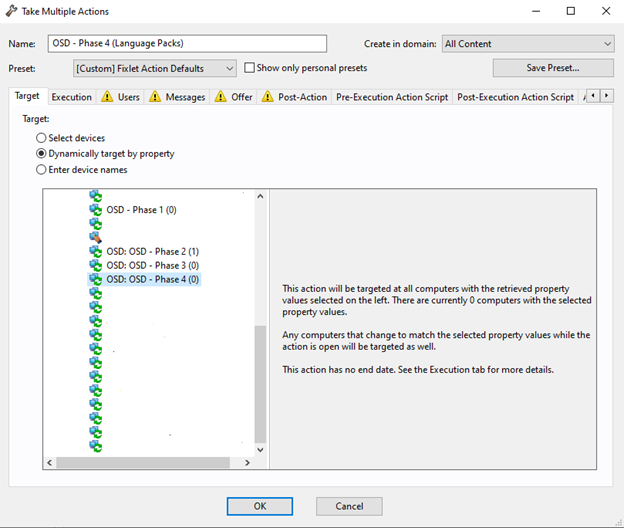
- Take action on OSD Phase 4.
- Select Dynamically target by property and By Group and then select OSD – Phase 4 Group.
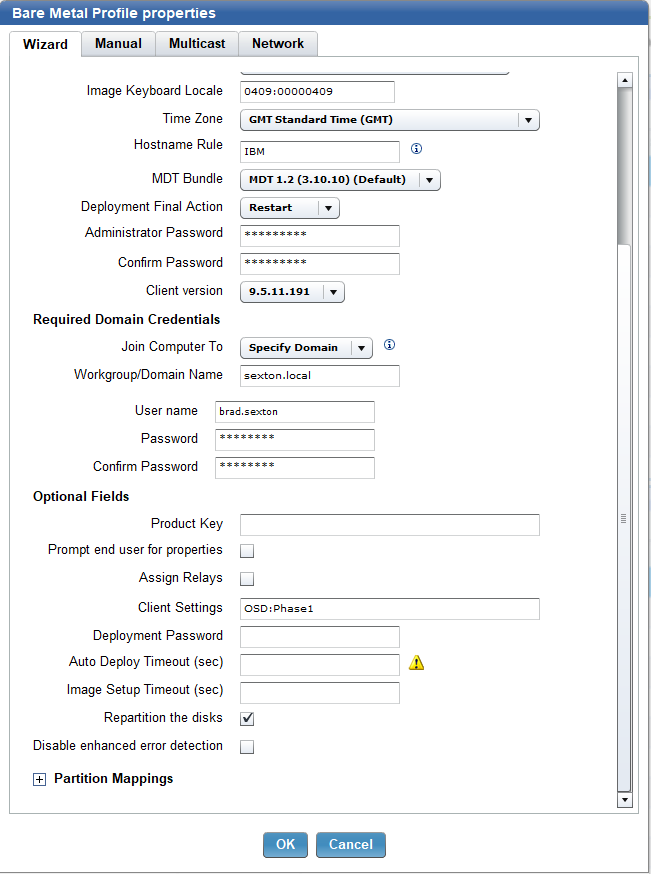
- Update the Bare Metal Profile so once the computer images, it automatically runs the OSD phases.
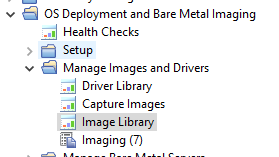
- Select Systems Lifecycle.

- Expand OS Deployment and Bare Metal Imaging.
- Expand Manage Images and Drivers and select Image Library.
- Select your uploaded Win or ISO. Select your Bare Metal Profile and click Edit.
- Enter OSD:Phase1 in Client Settings.
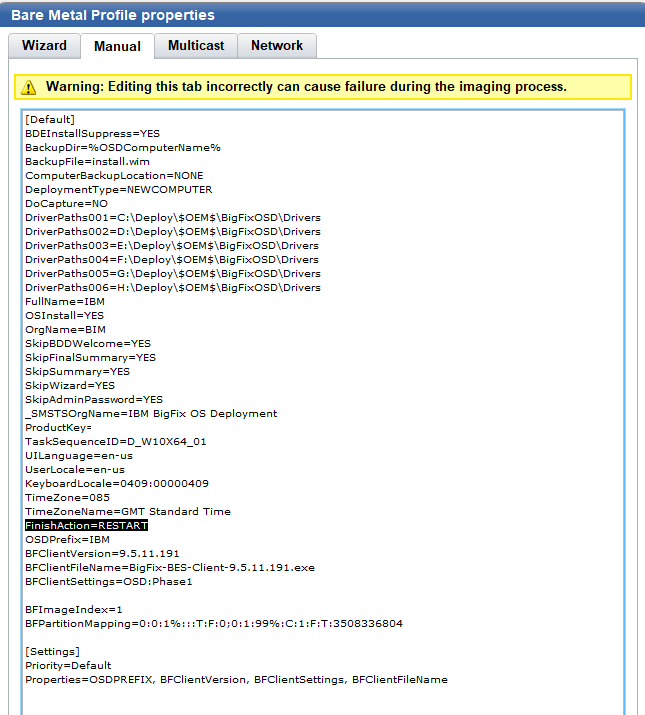
If you are adding your image to the domain, select the Manual tab and remove the following line: FinishAction=Restart
This gets enabled once the PC boots into Windows. It stays logged in as Administrator and runs through Phase1, Phase2, and Phase3. The BigFix agent then reboots the computer, joins the domain and completes the image process.
Examples
Here are some examples:
Phase 1 - Branding such as custom start menu, app associations, and custom task bars
Phase 2 - Software used in your enterprise
Phase 3 - Patches
Phase 4 - Language Packs
Anytime you update any of these phases, stop and redeploy each action so imaging receives the latest.
~~~~~~~~~~~~~~~~~~~~~~~~~~~~~~~~~~~~~~~~~~~~~~~~~~~~~~~~~~~~~~~~~~~~~
Author
Brad Sexton is a BigFix technical advisor for the mid-Atlantic region. He was a BigFix administrator in a global enterprise for 7 years where he was using BigFix for OSD, Software Deployments, and patching. Brad joined the HCL BigFix team in 2018.
Review and editorial credits
Shivi Sivasubramanian is a senior-level technical author and editor with a demonstrated history of working in the technology industry. A firm believer in the magical power of words, she loves helping the community deliver expressive, minimalist, and user-friendly content. Shivi currently leads a team of information developers in BigFix.

